Advent Calendar Day 4: Getting Hands-On with the Veeam REST API
Advent Calendar Day 4: Getting Hands-On with the Veeam REST API
Disclaimer:
I’m not a professional developer, and this script was created on a beta build of the software. It is intended to demonstrate the “art of the possible” rather than serve as production-ready code. Use this example with caution, and test thoroughly in your environment before relying on it for critical tasks.
Welcome back to Day 4 of our Veeam Blog Advent Calendar! Yesterday we explored the Veeam REST API through Swagger and learned about what’s new in V13.0.1. Today, we’re rolling up our sleeves and getting practical, I’m going to show you how to actually use the API with PowerShell and CLI tools to accomplish real-world tasks.
By the end of this post, you’ll be able to authenticate, retrieve information, and perform actions against your Veeam Backup & Replication server using nothing but scripts. Let’s dive in!
Setting Up Your Environment
Before we start making API calls, let’s make sure we have everything we need:
Prerequisites
- Veeam Backup & Replication: Version 12 or later (I’ll be using V13.0.1)
- PowerShell: Version 5.1 or later (PowerShell 7+ recommended)
- Network Access: Your machine needs to reach the VBR server on port 9419
- Credentials: Valid credentials for the VBR server
Testing Connectivity
Let’s make sure we can reach the API endpoint:
# Replace with your VBR server address
$vbrServer = "lab-vbr-01.westcoastlabs.xyz"
$uri = "https://${vbrServer}:9419/api/v1/serverTime"

# Test the connection (ignoring SSL for lab environments)
try {
    $response = Invoke-RestMethod -Uri $uri -Method Get -SkipCertificateCheck
    Write-Host "✓ Successfully connected to VBR API" -ForegroundColor Green
    Write-Host "Server Version: $($response.version)" -ForegroundColor Cyan
} catch {
    Write-Host "✗ Failed to connect: $($_.Exception.Message)" -ForegroundColor Red
}
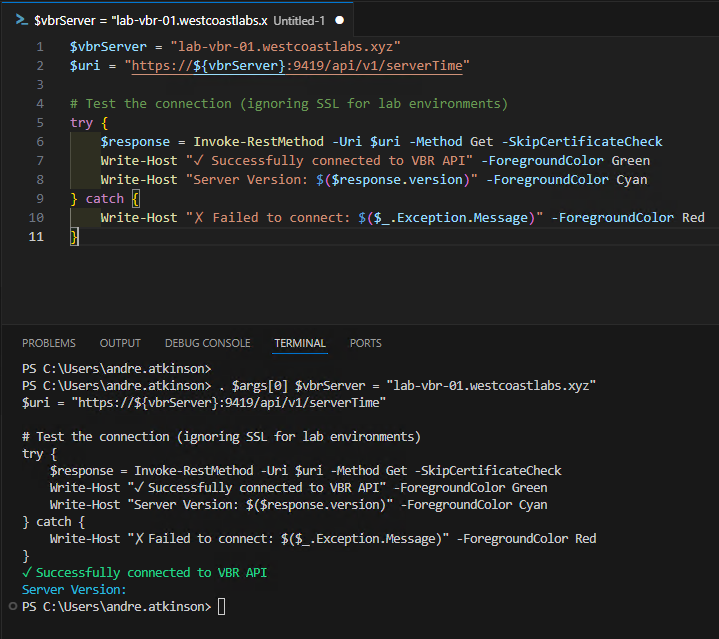
Note: In production, you should properly handle SSL certificates rather than skipping validation. For homelab environments with self-signed certificates, -SkipCertificateCheck is convenient for testing.
Authentication: Getting Your Access Token
Everything in the Veeam REST API requires authentication. We use OAuth 2.0 with bearer tokens. Here’s how to get your token:
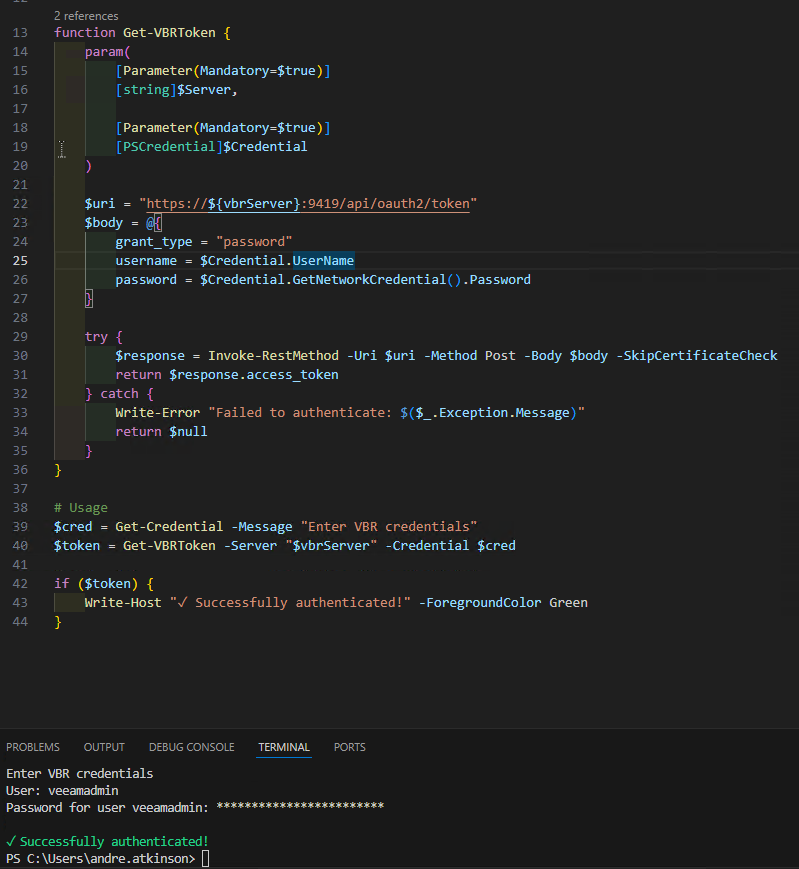
The Authentication Function
function Get-VBRToken {
    param(
        [Parameter(Mandatory=$true)]
        [string]$Server,

        [Parameter(Mandatory=$true)]
        [PSCredential]$Credential
    )

    $uri = "https://${Server}:9419/api/oauth2/token"
    $body = @{
        grant_type = "password"
        username = $Credential.UserName
        password = $Credential.GetNetworkCredential().Password
    }

    try {
        $response = Invoke-RestMethod -Uri $uri -Method Post -Body $body -SkipCertificateCheck
        return $response.access_token
    } catch {
        Write-Error "Failed to authenticate: $($_.Exception.Message)"
        return $null
    }
}

# Usage
$cred = Get-Credential -Message "Enter VBR credentials"
$token = Get-VBRToken -Server "$vbrServer" -Credential $cred

if ($token) {
    Write-Host "✓ Successfully authenticated!" -ForegroundColor Green
}
Creating Reusable Headers
Once you have the token, you’ll include it in every subsequent request:
$headers = @{
    "Authorization" = "Bearer $token"
    "Content-Type" = "application/json"
    "Accept" = "application/json"
}
Practical Examples: Real-World Scenarios
Now that we’re authenticated, let’s tackle some practical tasks you might encounter in your day-to-day operations.
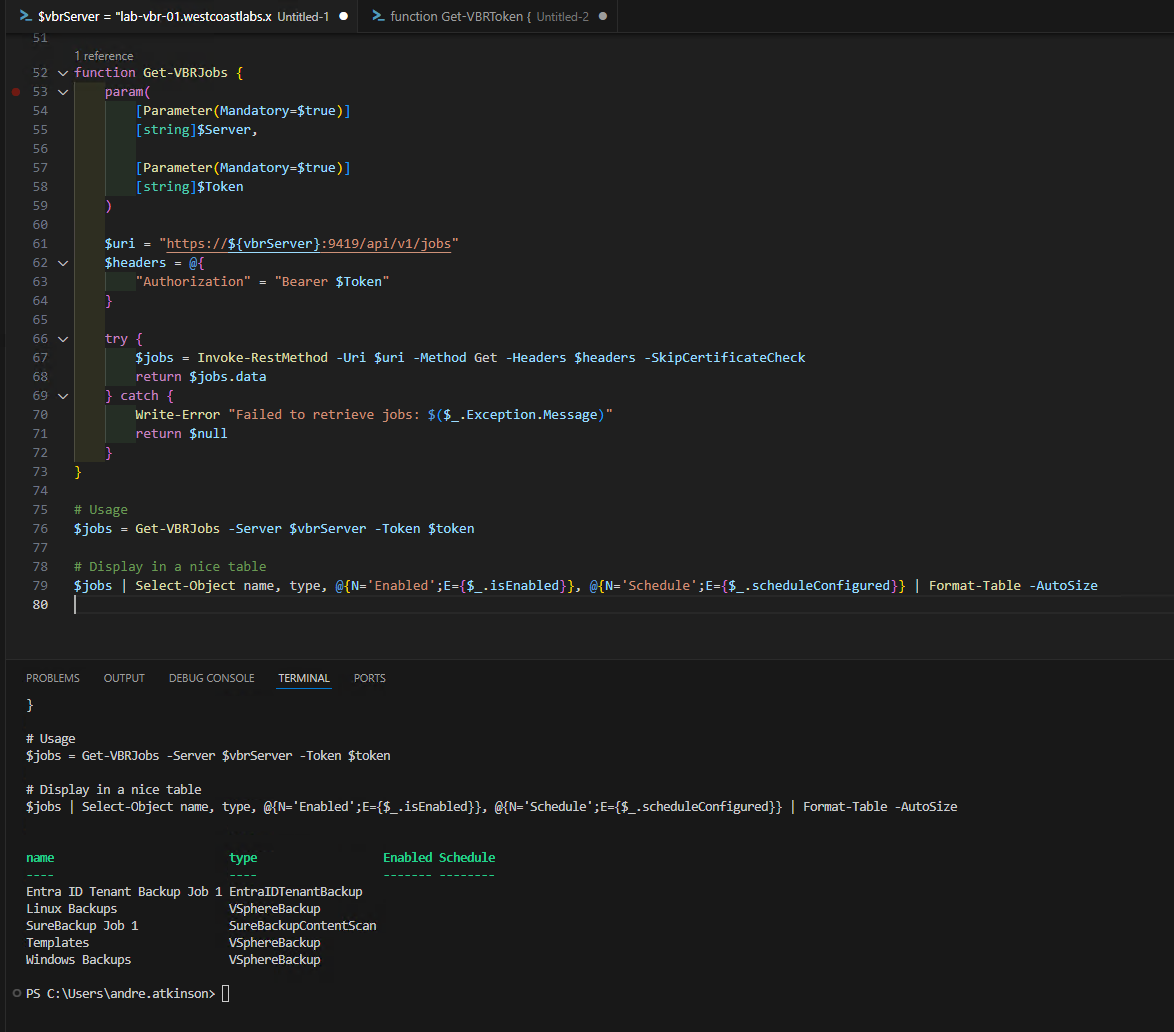
Example 1: Getting All Backup Jobs
Let’s retrieve all backup jobs and display them in a useful format:
function Get-VBRJobs {
    param(
        [Parameter(Mandatory=$true)]
        [string]$Server,

        [Parameter(Mandatory=$true)]
        [string]$Token
    )

    $uri = "https://${Server}:9419/api/v1/jobs"
    $headers = @{
        "Authorization" = "Bearer $Token"
    }

    try {
        $jobs = Invoke-RestMethod -Uri $uri -Method Get -Headers $headers -SkipCertificateCheck
        return $jobs.data
    } catch {
        Write-Error "Failed to retrieve jobs: $($_.Exception.Message)"
        return $null
    }
}

# Usage
$jobs = Get-VBRJobs -Server $vbrServer -Token $token

# Display in a nice table
$jobs | Select-Object name, type, @{N='Enabled';E={$_.isEnabled}}, @{N='Schedule';E={$_.scheduleConfigured}} | Format-Table -AutoSize
Example 2: Starting a Backup Job
Sometimes you need to kick off a backup job on-demand. Here’s how:
function Start-VBRJob {
    param(
        [Parameter(Mandatory=$true)]
        [string]$Server,

        [Parameter(Mandatory=$true)]
        [string]$Token,

        [Parameter(Mandatory=$true)]
        [string]$JobName
    )

    $headers = @{
        "Authorization" = "Bearer $Token"
        "Content-Type" = "application/json"
    }

    # First, get the job ID
    $jobs = Get-VBRJobs -Server $Server -Token $Token
    $job = $jobs | Where-Object { $_.name -eq $JobName }

    if (-not $job) {
        Write-Error "Job '$JobName' not found"
        return
    }

    $uri = "https://${Server}:9419/api/v1/jobs/$($job.id)/start"

    try {
        $response = Invoke-RestMethod -Uri $uri -Method Post -Headers $headers -SkipCertificateCheck
        Write-Host "✓ Job '$JobName' started successfully!" -ForegroundColor Green
        return $response
    } catch {
        Write-Error "Failed to start job: $($_.Exception.Message)"
    }
}

# Usage
Start-VBRJob -Server $vbrServer -Token $token -JobName "Daily VM Backup"
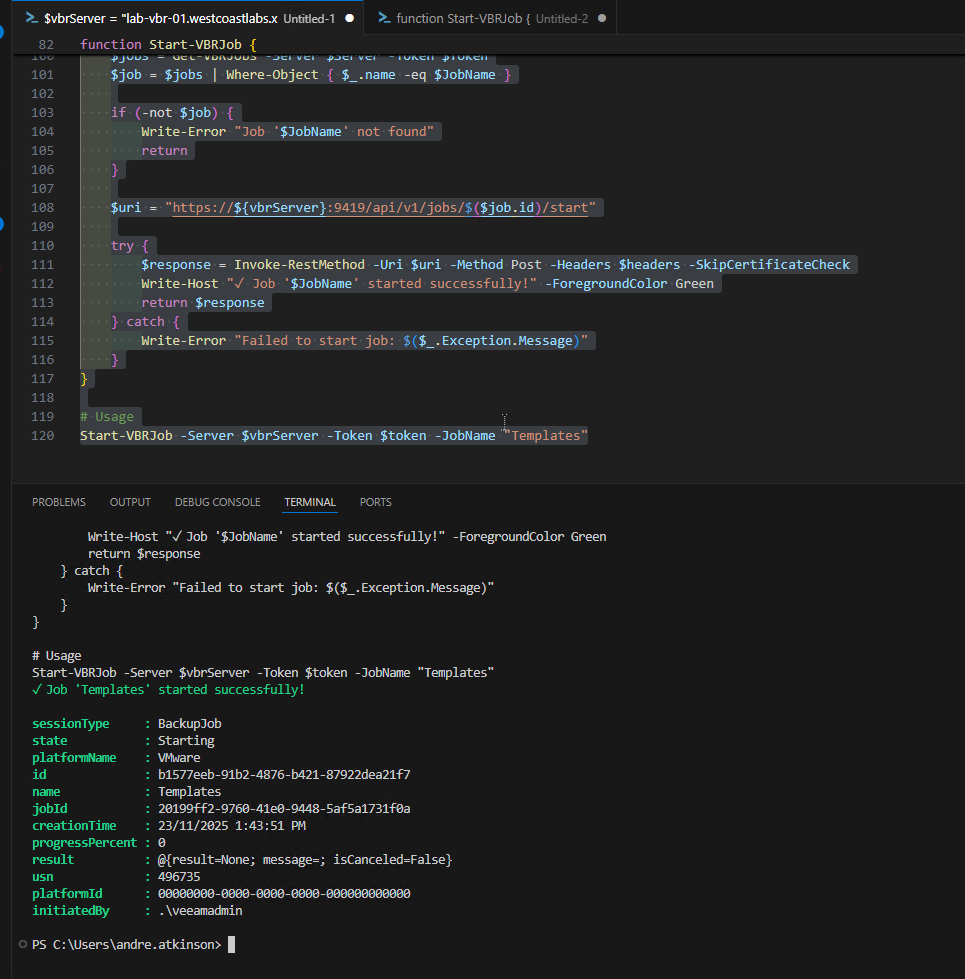
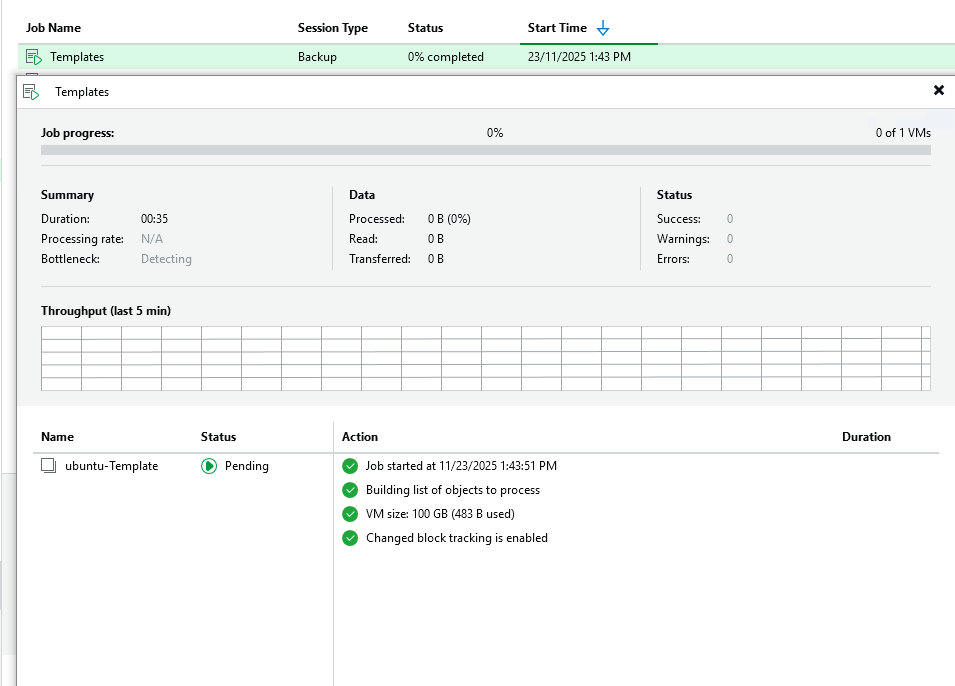
If we look in VBR we can now see the job running! how cool is that?
Using cURL for Quick Tests
Sometimes you just want to make a quick API call without writing a full PowerShell script. That’s where cURL comes in handy:
# Get a token
curl -X POST "https://vbr-server:9419/api/oauth2/token" \
  -H "Content-Type: application/x-www-form-urlencoded" \
  -d "grant_type=password&username=admin&password=YourPassword" \
  -k

# Use the token to get jobs
curl -X GET "https://vbr-server:9419/api/v1/jobs" \
  -H "Authorization: Bearer YOUR_TOKEN_HERE" \
  -k
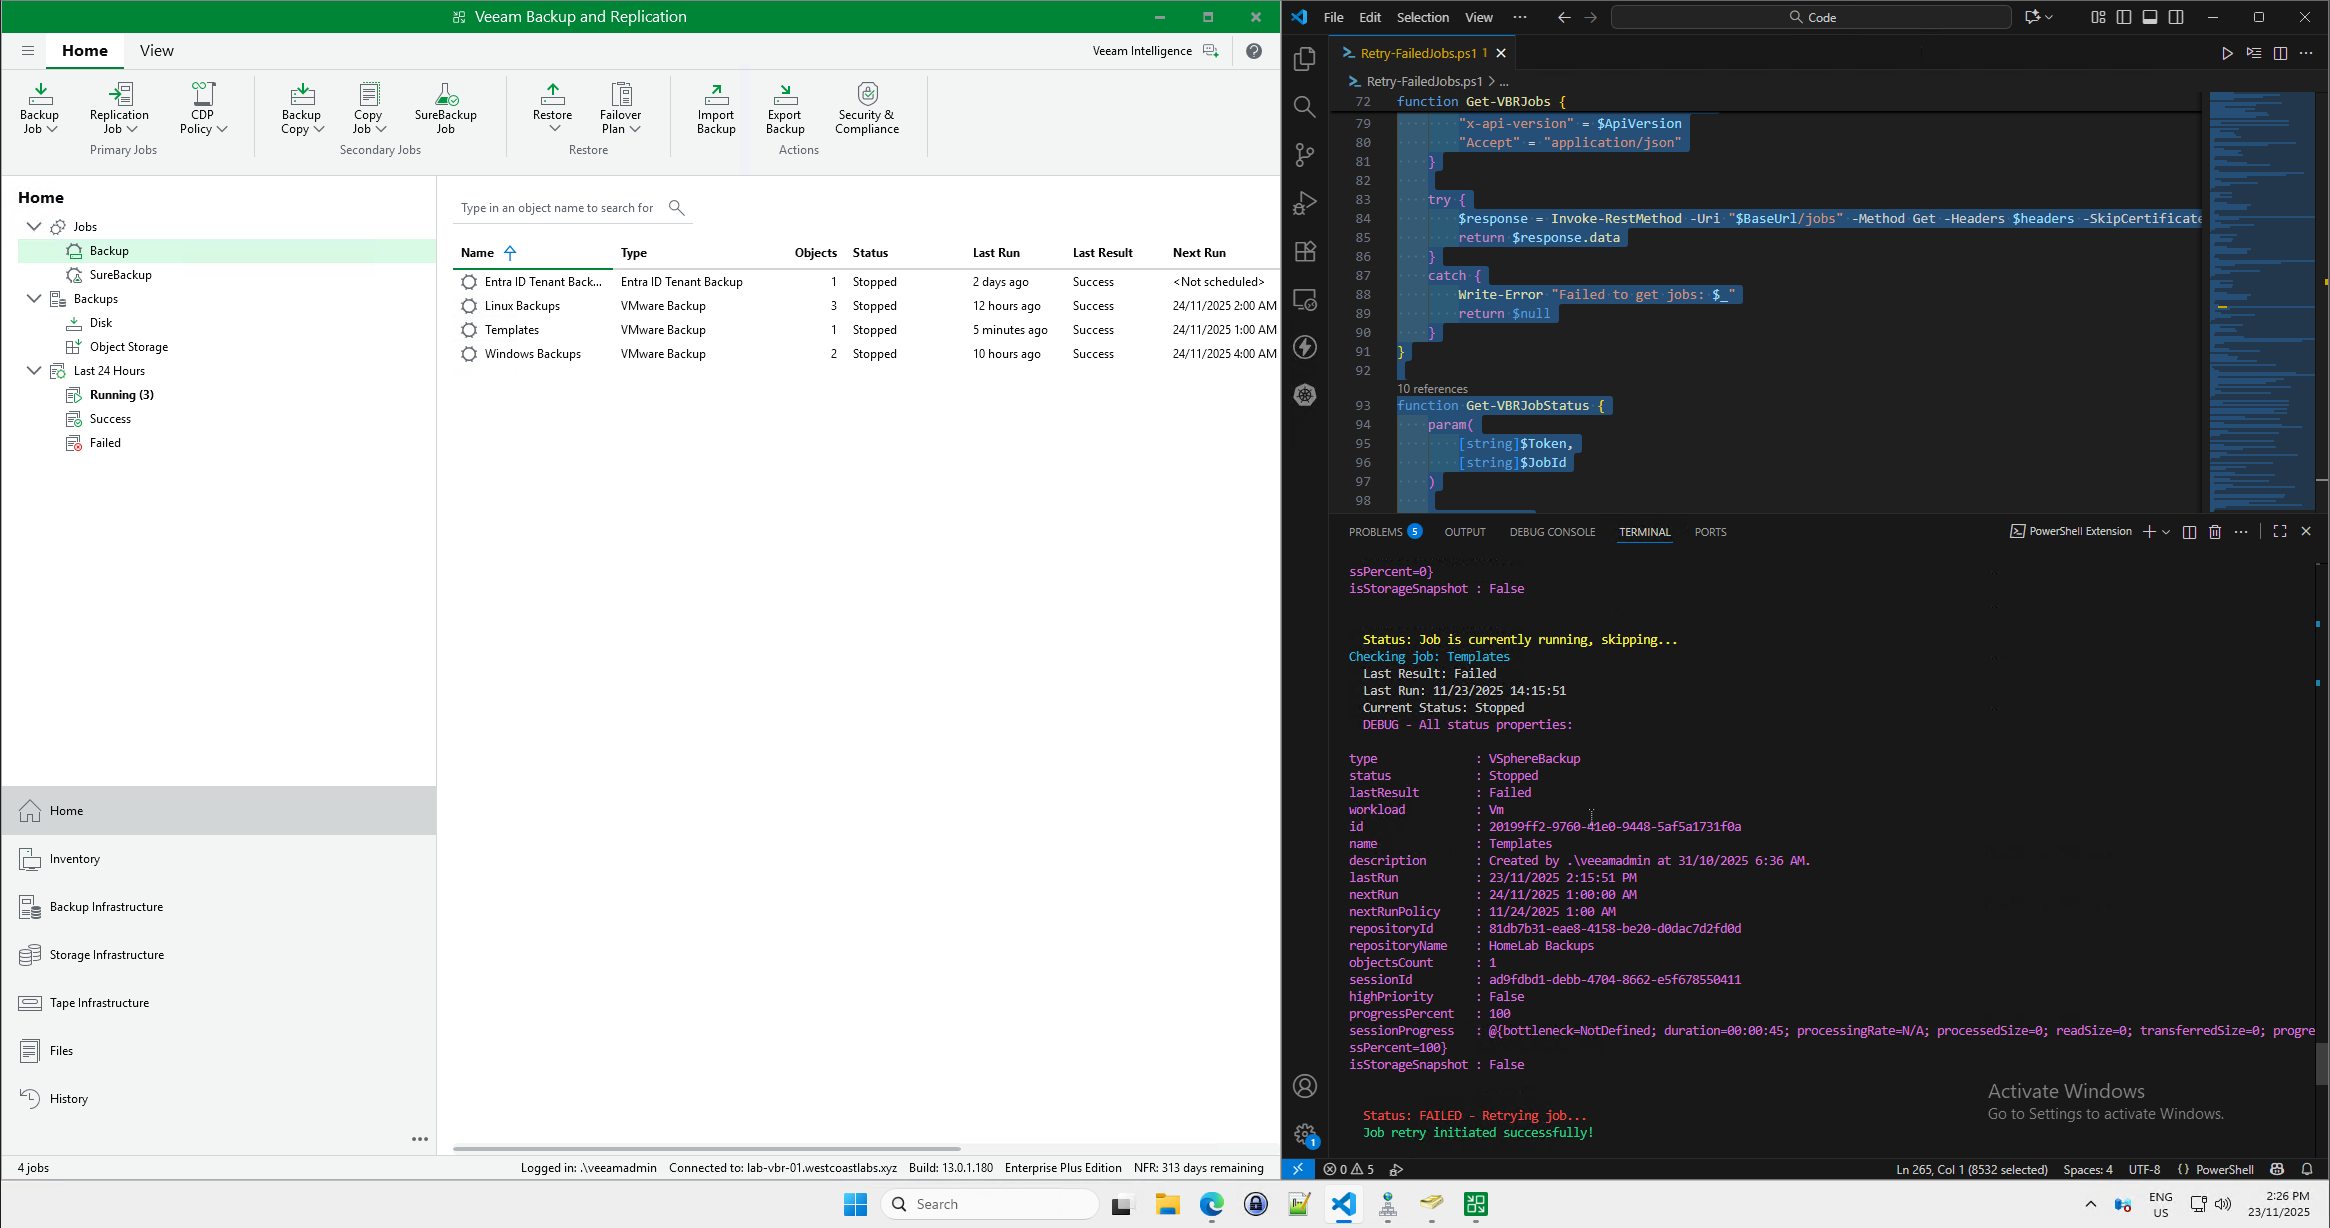
Building a Complete Script
Let’s put it all together into a comprehensive, self-healing backup script. As you can see in the screenshot above, we have a failed backup job. Instead of waiting for someone to notice and manually retry it, we can build an automated solution that proactively monitors for failures and takes corrective action.
This script demonstrates a powerful pattern: self-healing infrastructure. By combining the Veeam REST API with PowerShell automation, we can create a system that:
- Detects failed backup jobs automatically
- Responds by immediately retrying the failed jobs
- Notifies the backup administrator via email
- Prevents backup gaps that could leave your environment vulnerable
This script was a bit long to paste here so I’ve uploaded it to my Github here but as we can see from the screenshot below it automatically re-ran my templates job and sent me an email to let me know it’s done so… pretty cool right?
Best Practices and Tips
Before we wrap up, here are some important tips for working with the Veeam REST API:
1. Token Expiration
Tokens expire after a certain period. Always handle token expiration gracefully and re-authenticate when needed.
2. Rate Limiting
Be mindful of how frequently you’re calling the API. For monitoring scenarios, consider caching results rather than making the same call repeatedly.
3. Error Handling
Always wrap API calls in try-catch blocks and handle errors appropriately. The API returns detailed error messages that can help you troubleshoot issues.
4. Use Query Parameters
When retrieving large datasets, use filtering and pagination to reduce the amount of data transferred.
5. SSL Certificate Validation
In production, properly validate SSL certificates. Use -SkipCertificateCheck only in lab environments.
What’s Next?
Today we’ve gotten hands-on with the Veeam REST API using PowerShell and CLI tools. You now have a solid foundation for building your own automation scripts and integrations!
Tomorrow (Day 5), we’re taking things in an exciting new direction. We’ll be setting up N8N, a powerful workflow automation platform that will let us build visual workflows connecting Veeam with other services, all without writing code. Then on Day 6, we’ll create some amazing integrations!
See you tomorrow for Day 5, where we’ll set up N8N! 🎄