Advent Calendar Day 5: Setting Up N8N for Workflow Automation (Part 1)
Advent Calendar Day 5: Setting Up N8N for Workflow Automation (Part 1)
Disclaimer:
I’m not a professional developer, and this script was created on a beta build of the software. It is intended to demonstrate the “art of the possible” rather than serve as production-ready code. Use this example with caution, and test thoroughly in your environment before relying on it for critical tasks.
Welcome to Day 5 of our Veeam Blog Advent Calendar! Over the past few days, we’ve been exploring the Veeam REST API through Swagger and PowerShell scripts. Today, we’re taking automation to the next level by introducing N8N (pronounced “n-eight-n”), a powerful workflow automation tool that’s about to change how you think about integrations.
If you’ve ever wished you could connect Veeam to Slack, email, databases, webhooks, and hundreds of other services without writing extensive code, N8N is exactly what you’ve been looking for. Think of it as your personal automation butler that can orchestrate complex workflows with a visual, drag-and-drop interface.
What is N8N?
N8N is an open-source workflow automation tool that lets you connect different services and automate tasks between them. It’s similar to tools like Zapier or Microsoft Power Automate, but with some key advantages that make it particularly appealing for homelab and enterprise environments.
The tool is self-hosted, which means you maintain complete control over where it runs and ensure your data stays within your infrastructure. Being open source, it’s free to use and benefits from an active community constantly contributing improvements and integrations. The platform is highly extensible, making it straightforward to create custom nodes for any API you need to integrate. While it features a visual workflow builder that eliminates the need for coding in most scenarios, it also provides powerful JavaScript expression support when you need more advanced logic. The fair-code licensing model keeps it free for personal use and small teams, making it accessible to hobbyists and professionals alike.
Why N8N for Veeam Automation?
You might be wondering, “Why not just stick with PowerShell scripts?” Great question! N8N brings several advantages that transform how you approach automation in your Veeam environment.
The visual workflow interface allows you to see your entire automation process at a glance, making it easier to understand complex processes that would otherwise be buried in lines of code. When something goes wrong, the debugging process becomes significantly simpler because you can test each step individually and watch the data flow through your workflow in real-time.
N8N really shines when you need to integrate Veeam with services that don’t have PowerShell modules or APIs that are cumbersome to work with directly. The platform comes with a built-in scheduler supporting cron expressions, eliminating the need to manage Windows Task Scheduler or cron jobs separately. Error handling becomes visual and intuitive, with dedicated error workflow paths and configurable retry logic that you can see and adjust graphically.
Perhaps one of the most powerful features is webhook support, which allows external events to trigger your workflows instantly rather than relying on polling or scheduled checks. This opens up possibilities for event-driven automation that responds immediately to changes in your environment. Finally, the no-code approach means that team members without development backgrounds can build and maintain workflows, democratizing automation across your organization and reducing the bottleneck of relying solely on developers or scripters.
Imagine building a workflow that:
- Checks for failed Veeam backups via the API
- Queries your CMDB to find the VM owner
- Sends a formatted Slack message to the owner
- Creates a ticket in your ticketing system
- Updates a dashboard in Grafana
All of this without writing a single line of code? That’s the power of N8N!
Prerequisites
Before we begin, make sure you have:
- Docker: Version 20.10 or later
- Docker Compose: Version 2.0 or later (usually included with Docker Desktop)
- At least 2GB RAM: For N8N to run comfortably
- Network Access: To pull the Docker image and access the web UI
- A Modern Browser: Chrome, Firefox, or Edge recommended
Setting Up N8N with Docker Compose
For this guide, we’ll use Docker Compose to deploy N8N. This approach provides a production-ready setup with persistent data storage and easy configuration management - perfect for homelab environments.
Step 1: Create the Project Directory
First, let’s create a directory to hold our N8N configuration:
mkdir -p ~/n8n-docker
cd ~/n8n-docker
Step 2: Create the Data Directory
N8N needs a place to store its data persistently. Create a local folder that will be mapped to the container:
mkdir -p ~/.n8n
This directory will store:
- Workflow definitions
- Credentials
- Execution history
- Settings
Step 3: Set Environment Variables
Create a .env file to store configuration. This keeps sensitive information separate from the Docker Compose file:
cat > .env << 'EOF'
# N8N Configuration
N8N_BASIC_AUTH_ACTIVE=true
N8N_BASIC_AUTH_USER=admin
N8N_BASIC_AUTH_PASSWORD=ChangeThisPassword123!

# PostgreSQL Configuration
POSTGRES_USER=n8n
POSTGRES_PASSWORD=ChangeThisDatabasePassword123!
POSTGRES_DB=n8n

# Timezone
GENERIC_TIMEZONE=Australia/Sydney
EOF
Important: Change the passwords above to something secure! These are just examples.
Step 4: Create the Docker Compose File
Now, create the docker-compose.yml file. This defines both N8N and a PostgreSQL database for better performance and reliability:
version: '3.8'

volumes:
  db_storage:
  n8n_storage:

services:
  postgres:
    image: postgres:16
    restart: unless-stopped
    environment:
      - POSTGRES_USER
      - POSTGRES_PASSWORD
      - POSTGRES_DB
    volumes:
      - db_storage:/var/lib/postgresql/data
    healthcheck:
      test: ['CMD-SHELL', 'pg_isready -h localhost -U ${POSTGRES_USER} -d ${POSTGRES_DB}']
      interval: 5s
      timeout: 5s
      retries: 10

  n8n:
    image: docker.n8n.io/n8nio/n8n
    restart: unless-stopped
    ports:
      - 5678:5678
    environment:
      - N8N_BASIC_AUTH_ACTIVE
      - N8N_BASIC_AUTH_USER
      - N8N_BASIC_AUTH_PASSWORD
      - DB_TYPE=postgresdb
      - DB_POSTGRESDB_HOST=postgres
      - DB_POSTGRESDB_PORT=5432
      - DB_POSTGRESDB_DATABASE=${POSTGRES_DB}
      - DB_POSTGRESDB_USER=${POSTGRES_USER}
      - DB_POSTGRESDB_PASSWORD=${POSTGRES_PASSWORD}
      - GENERIC_TIMEZONE
    volumes:
      - n8n_storage:/home/node/.n8n
    depends_on:
      postgres:
        condition: service_healthy
Step 5: Start N8N
Now we’re ready to launch N8N:
docker compose up -d
This will:
- Pull the N8N and PostgreSQL images (if not already present)
- Create the necessary volumes
- Start both containers in the background
Step 6: Verify the Installation
Check that both containers are running:
docker compose ps
You should see both n8n and postgres with a status of “running”.
View the logs to ensure everything started correctly:
docker compose logs -f n8n

Step 7: Access the N8N Interface
Open your browser and navigate to:
http://localhost:5678
You’ll be prompted to log in with the credentials you set in the .env file:
- Username: admin (or whatever you set)
- Password: The password you set
Once logged in, you’ll see the N8N welcome screen!
Understanding the Setup
Let’s break down what we just created. At the heart of our setup is a PostgreSQL database that stores all N8N data including workflows, credentials, and execution history. Unlike SQLite, PostgreSQL provides better performance for production use and includes health checks to ensure N8N only starts when the database is ready and available. Working alongside the database is the N8N container itself, which runs the main application exposed on port 5678. It connects to PostgreSQL for data persistence and uses basic authentication to secure access to the web interface.
The setup uses two key volumes to ensure data persists across container restarts: db_storage for PostgreSQL data and n8n_storage for N8N’s workflow files and configurations. All sensitive configuration is managed through environment variables stored in the .env file, which keeps passwords and settings separate from the Docker Compose file and makes them easy to update without modifying the container definitions.
Creating Your First Workflow
Now that N8N is running, let’s create a simple test workflow to make sure everything works:
- Click “Add workflow” or the + button
- Click the + button on the canvas to add a node
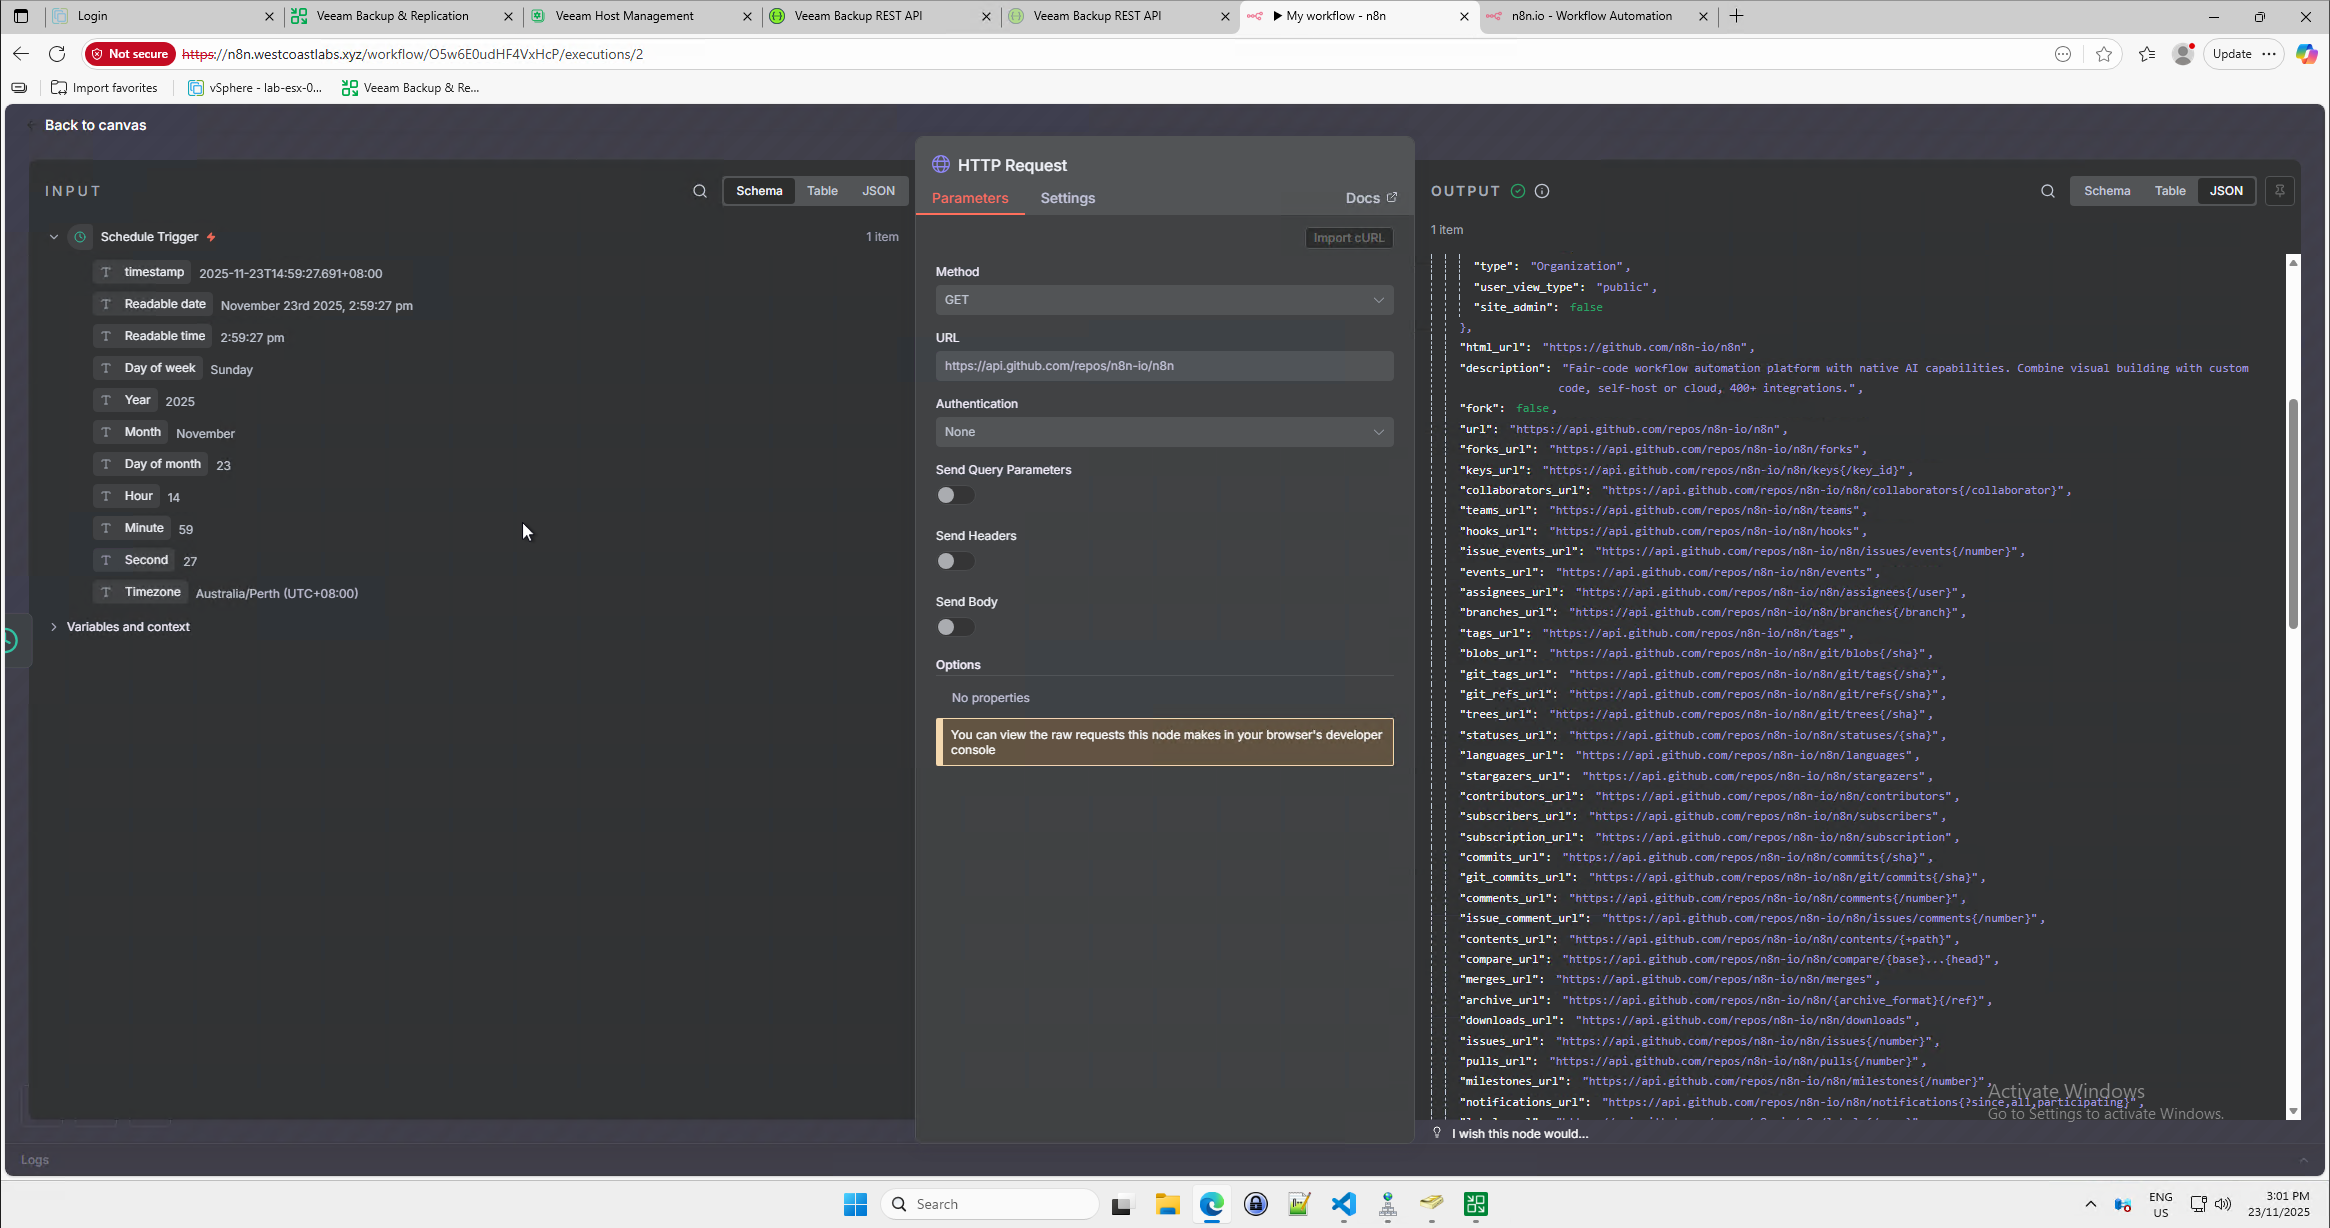
- Search for and select “Schedule Trigger”
- Set it to run every 1 minute
- Click “Add node” again
- Search for and select “HTTP Request”
- Configure it:
- Method: GET
- URL:
https://api.github.com/repos/n8n-io/n8n
- Connect the two nodes by dragging from the Schedule node to the HTTP Request node
- Click “Save” and give your workflow a name (e.g., “Test Workflow”)
- Click “Active” to enable the workflow

After a minute, you should see executions appearing. Click on an execution to see the data returned from GitHub’s API and man is it alot of data and that was literally as simple as following the bouncing ball.
What’s Next?
Today we’ve successfully set up N8N and created our first simple workflow. We’ve laid the groundwork for some powerful automation!
Tomorrow in Day 6, we’re going to bring everything together. We’ll create actual workflows that integrate Veeam Backup & Replication with N8N, using the REST API knowledge we gained earlier this week. We’ll build practical automations like:
- Monitoring backup jobs and sending notifications
- Creating automated reports
- Triggering backups based on external events
- And more!
Wrapping Up
N8N is an incredibly powerful tool that opens up endless automation possibilities. The visual interface makes it accessible to everyone, while the advanced features satisfy power users. Combined with the Veeam REST API, you’re now equipped to build sophisticated automations that can transform how you manage your backup infrastructure.
Make sure your N8N instance is running and accessible, because tomorrow we’re going to put it to work!
See you tomorrow for Day 6, where the real magic happens! 🎄