Advent Calendar Day 6: Building Veeam Workflows with N8N (Part 2)
Advent Calendar Day 6: Building Veeam Workflows with N8N (Part 2)
Disclaimer:
I’m not a professional developer, and this script was created on a beta build of the software. It is intended to demonstrate the “art of the possible” rather than serve as production-ready code. Use this example with caution, and test thoroughly in your environment before relying on it for critical tasks.
Welcome to Day 6 of our Veeam Blog Advent Calendar! Over the past few days, we’ve been on quite a journey. We explored the Veeam REST API, learned to use it with PowerShell, and yesterday we set up N8N. Today, we’re bringing it all together to create a powerful security automation workflow that could be a game-changer for your environment.
This is where automation becomes truly exciting. We’re going to build a security incident response workflow that monitors Veeam for malware detection events and automatically takes action by shutting down infected VMs in vCenter. No more juggling multiple scripts, no more manual intervention during security incidents—just elegant, visual automation that protects your infrastructure.
What We’re Building Today
We’ll create a comprehensive malware response workflow that:
- Monitors Veeam: Continuously polls the Veeam REST API for new malware detection events
- Identifies Infected VMs: Extracts VM information from the malware event
- Takes Immediate Action: Automatically powers off the infected VM in vCenter using the VMware API
- Sends Notifications: Alerts your security team via Slack/Teams/Email about the incident
This is real-world automation that demonstrates the power of integrating Veeam’s malware detection capabilities with automated remediation. Let’s dive in!
Understanding Veeam Malware Detection Events
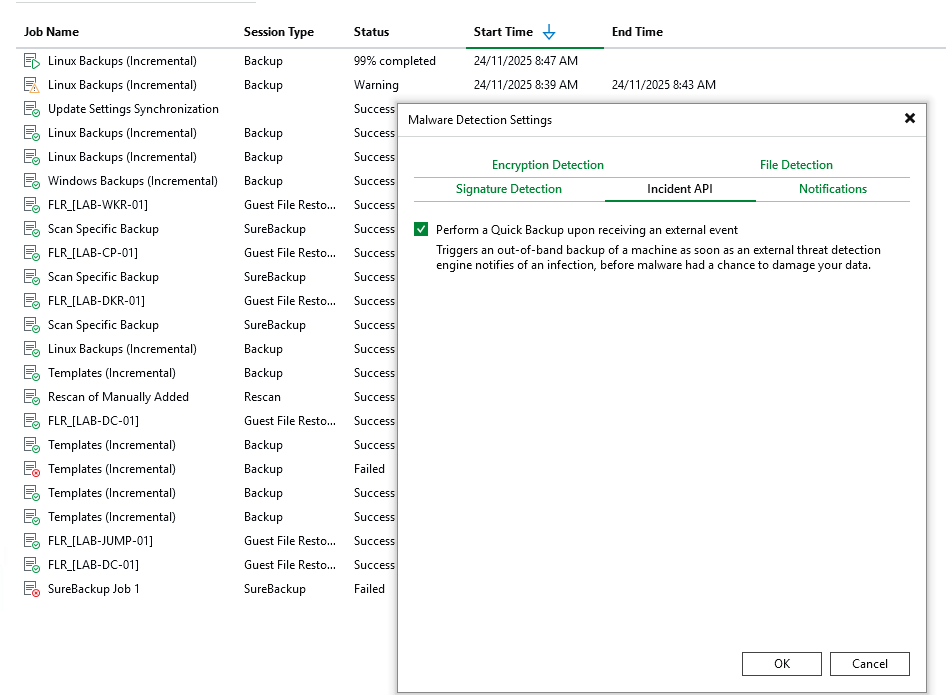
Before we build the workflow, let’s understand what we’re working with. Veeam Backup & Replication includes malware detection capabilities that can identify ransomware and other threats in your backups. When malware is detected, Veeam creates an event that we can query via the REST API.
The Veeam REST API provides access to malware events through the /api/v1/malwareDetection/events, what we can do here as well is if we enable the incident API it will automatically trigger a backup of the workload as well so blending in our own automation but also leaning on Veeam and the automation they have already included.
Prerequisites
Before we begin, ensure you have:
- N8N Running: From yesterday’s setup (Part 1)
- Veeam Backup & Replication: Version 12 or later with REST API enabled (I’m using V13.0.1)
- vCenter Server: With administrative access
- Network Access: N8N can reach both Veeam and vCenter APIs
- Credentials:
- Veeam administrator account
- vCenter administrator account (with VM power management permissions)
Setting Up Credentials in N8N
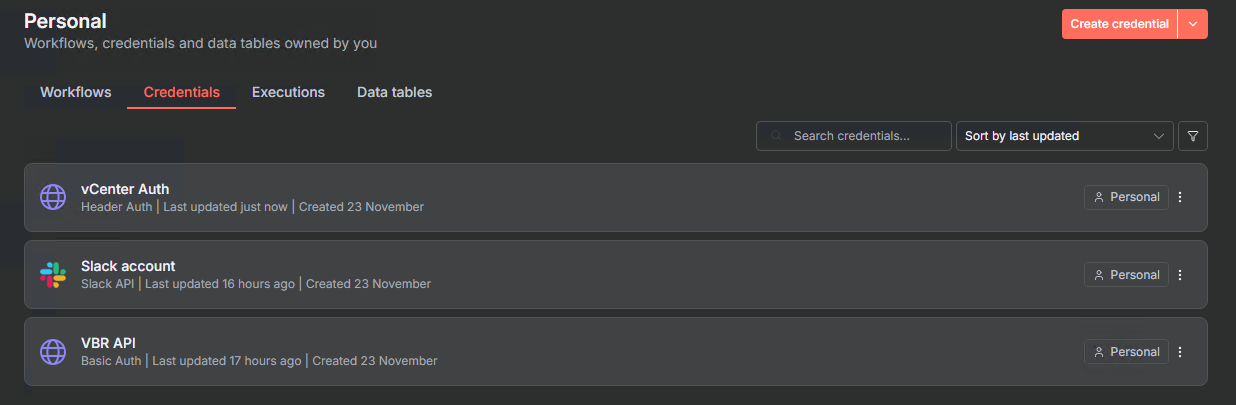
Ok so to kick things off we will need to add in our credentials as we will need to authenticate in three different places namely Veeam, vCenter and Slack for notifications.
To do that we head over to Credentials add the three credentials as shown below
- VBR API: Basic Auth (username and password for Veeam)
- Slack Account: Access Token (from your Slack workspace)
- vCenter Auth: Header Auth (username and password for vCenter)
Once we have added in our credentials we can start having some fun and building out our workflow.
Note: For production environments, consider using dedicated service accounts with minimum required permissions rather than full administrator accounts. This is pretty obvious but worth calling out anyways!
Building the Malware Response Workflow
Now let’s build the complete workflow step by step. This will monitor Veeam for malware events and automatically shut down infected VMs.
TLDR
Here is the completed workflow however ill step through the steps below but just so you have an idea of what it will look like
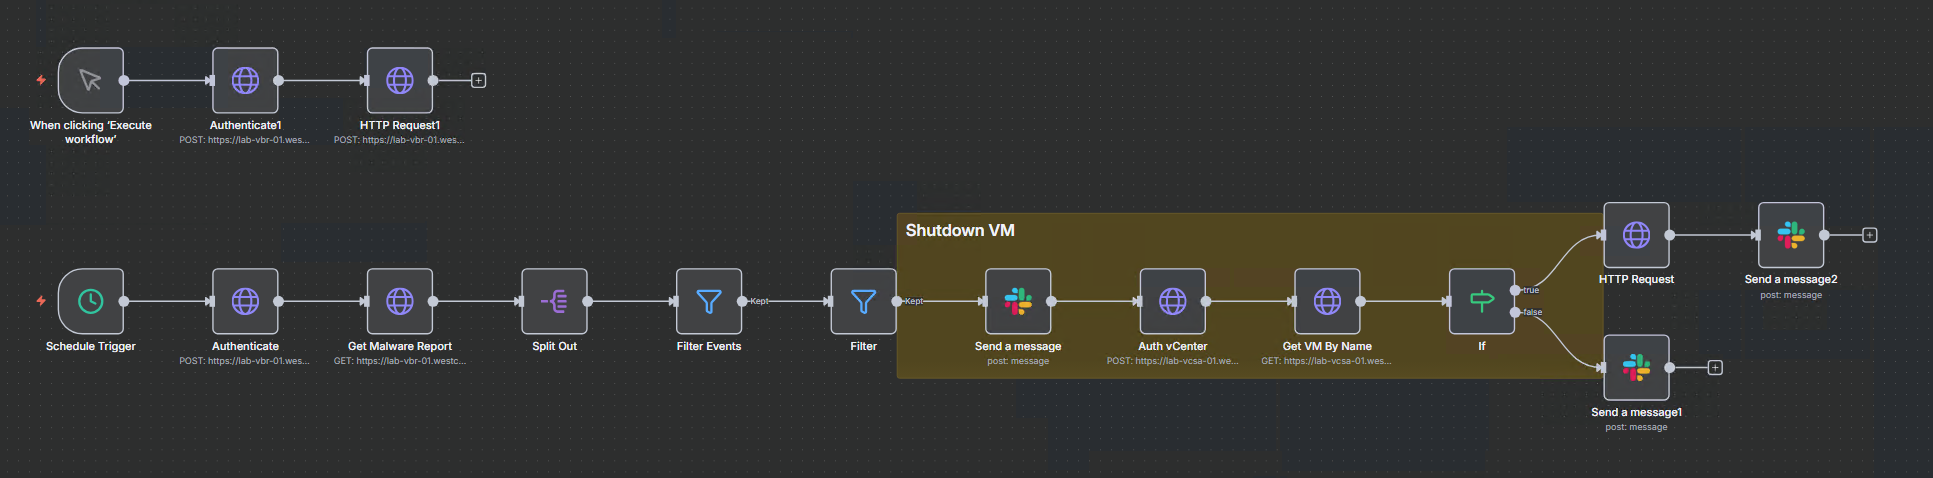
Basically what we are doing is on the top row we are just manually triggering an API call to Veeam to Create a Malware event for a workload because i got tired of doing it in the swagger interface :)
Below that we have the actual workflow, starting with a schedule trigger that runs every 1 minute, next we authenticate with our Veeam Backup and Replication server and get a list of the latest malware events, we then filter those by severity (Infected & Suspicious) and then filter again based on time (only want the last 5 minutes).
If something is detected it will send a message to a slack channel to notify the admin team that something has been found, at this point a backup has already been trigged thanks to the incident API in Veeam, moving forward it will then authenticate to vCenter and poweroff the VM to reduce the blast radius and try to contain the infection and then send another message to the slack channel to confirm its powered down.
Right with that TLDR out the way lets run through how we actually put this together.
Step 1: Create the Workflow
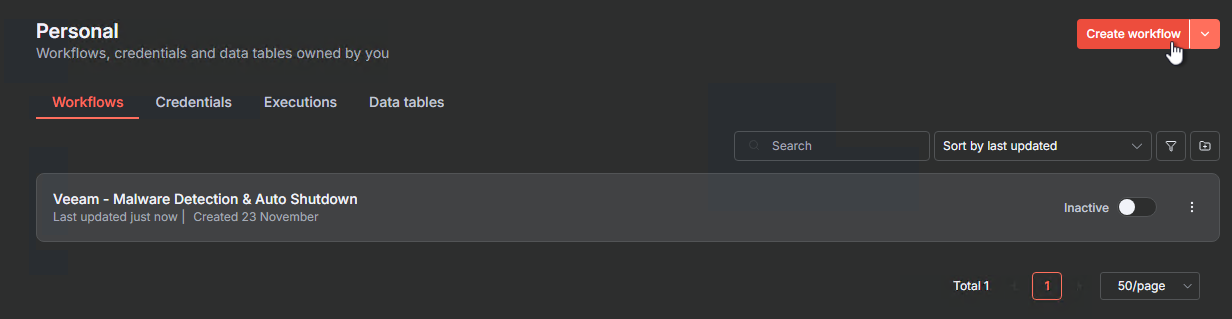
- In N8N, click Workflows → Add workflow
- Name it:
Veeam - Malware Detection & Auto Shutdown - Add a description:
Monitors Veeam for malware events and automatically powers off infected VMs in vCenter
Step 2: Add the Schedule Trigger
We’ll poll Veeam every 1 minute for new malware events:
- Click the + button to add a node
- Search for and select Schedule Trigger
- Configure:
- Trigger Interval: Every 1 minute
- Rule: Minutes interval
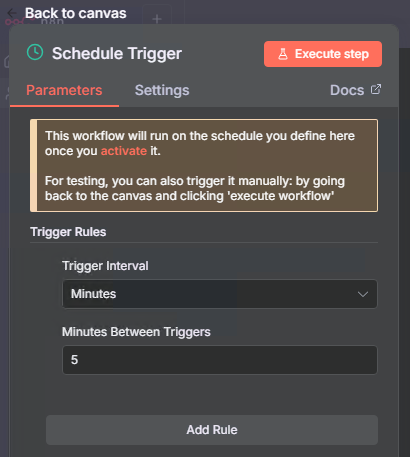
Note: In production, you might want to increase this to 5 minutes to reduce API load. For testing and rapid response, 1 minute works well.
Step 3: Authenticate with Veeam
Add an HTTP Request node to get an access token:
- Add node: HTTP Request
- Name it:
Authenticate - Configure:
- Method: POST
- URL:
https://YOUR-VBR-SERVER:9419/api/oauth2/token - Send Headers: On
- Add header
accept:application/json - Add header
x-api-version:1.3-rev1
- Add header
- Send Body: On
- Body Content Type: Form URL Encoded
- Body Parameters:
grant_type:Passwordusername:YOUR_USERNAMEpassword:YOUR_PASSWORD
- Options → SSL Certificates: Ignore SSL Issues (for self-signed certs in lab)
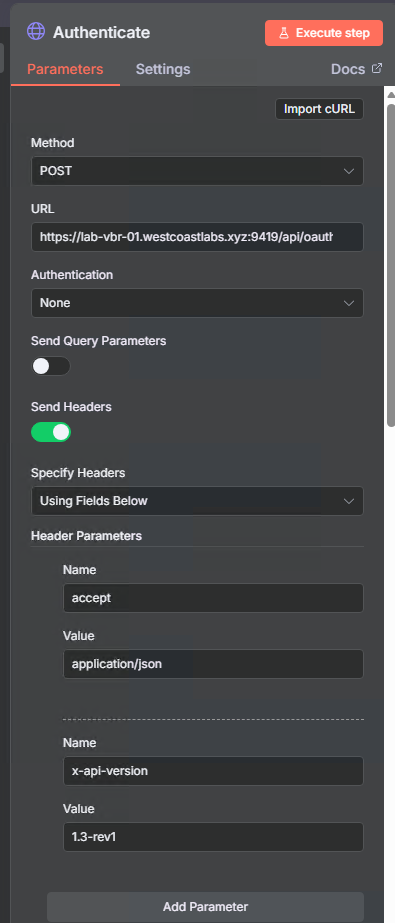
This authenticates with Veeam and returns an access_token we’ll use in subsequent requests.
Step 4: Get Malware Events from Veeam
Now we’ll query the malware detection events:
- Add node: HTTP Request
- Name it:
Get Malware Report - Configure:
- Method: GET
- URL:
https://YOUR-VBR-SERVER:9419/api/v1/malwareDetection/events - Send Query Parameters: On
- Add parameter
limit:200
- Add parameter
- Send Headers: On
- Add header
accept:application/json - Add header
x-api-version:1.3-rev1 - Add header
Authorization:Bearer {{ $json.access_token }}
- Add header
- Options → SSL Certificates: Ignore SSL Issues
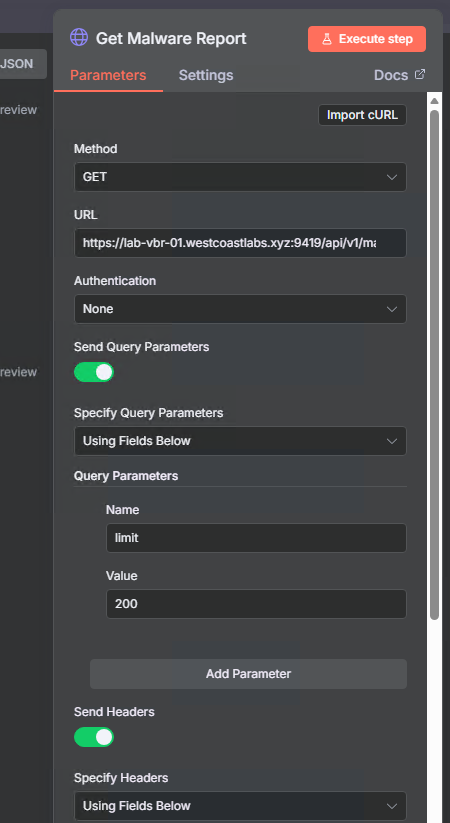
Notice we’re using the access token from the previous authentication step and limiting results to 200 events.
Step 5: Split Out the Data Array
The Veeam API returns events in a data array. We need to split this so each event can be processed individually:
- Add node: Split Out
- Name it:
Split Out - Configure:
- Field To Split Out:
data
- Field To Split Out:
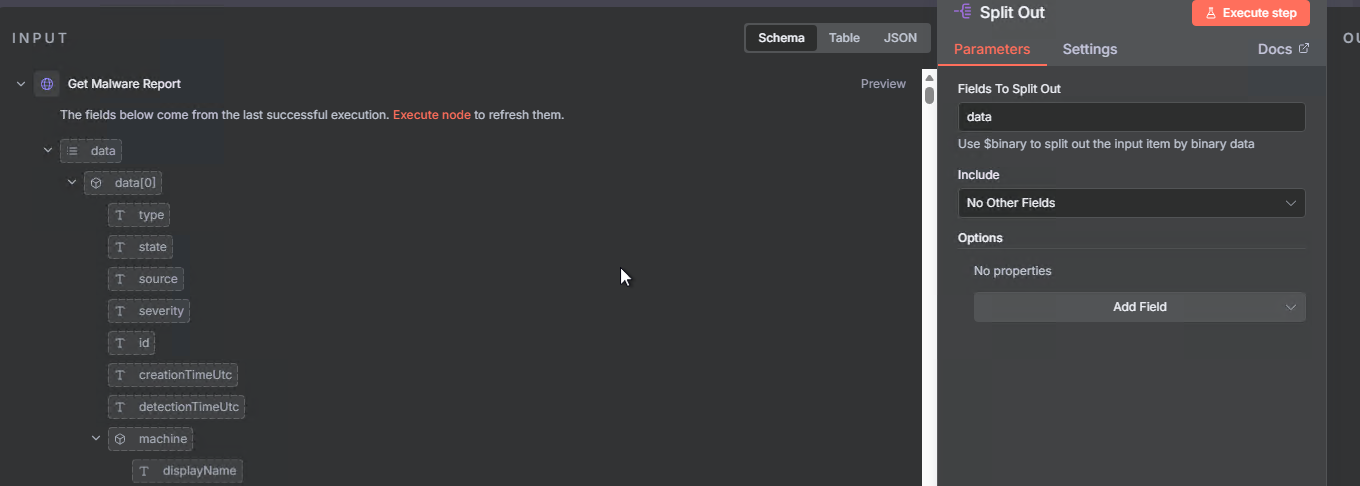
This node takes the array of events and creates individual items for each one, making it easier to filter and process them.
Step 6: Filter by Severity (Infected & Suspicious)
We want to focus only on the most critical events:
- Add node: Filter
- Name it:
Filter Events - Configure:
- Conditions:
- Condition 1:
{{ $json.severity }}equalsInfected - Combine: OR
- Condition 2:
{{ $json.severity }}equalsSuspicious
- Condition 1:
- Conditions:
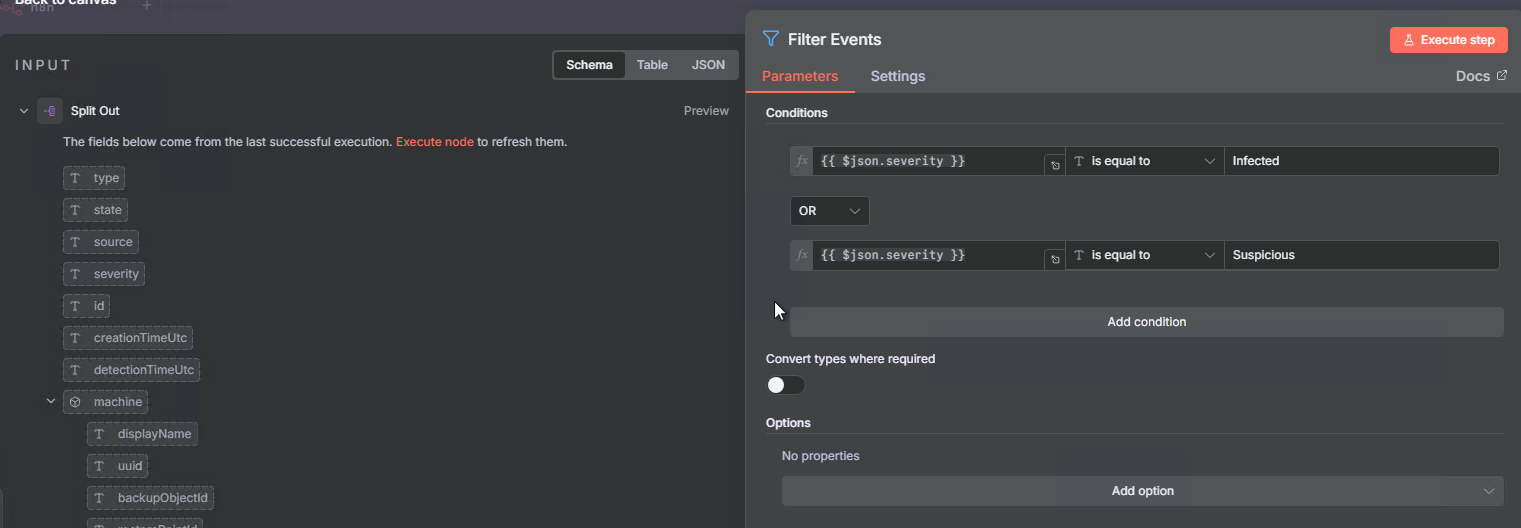
This ensures we only process events that are marked as Infected or Suspicious, filtering out lower-priority detections.
Step 7: Filter by Time (Last 5 Minutes)
We only want recent events to avoid processing old detections:
- Add node: Filter
- Name it:
Filter - Configure:
- Conditions:
- Condition 1:
{{ $json.detectionTimeUtc }}is after{{ new Date(Date.now() - 5 * 60 * 1000).toISOString() }}
- Condition 1:
- Type Validation: Loose (important for date comparisons)
- Conditions:
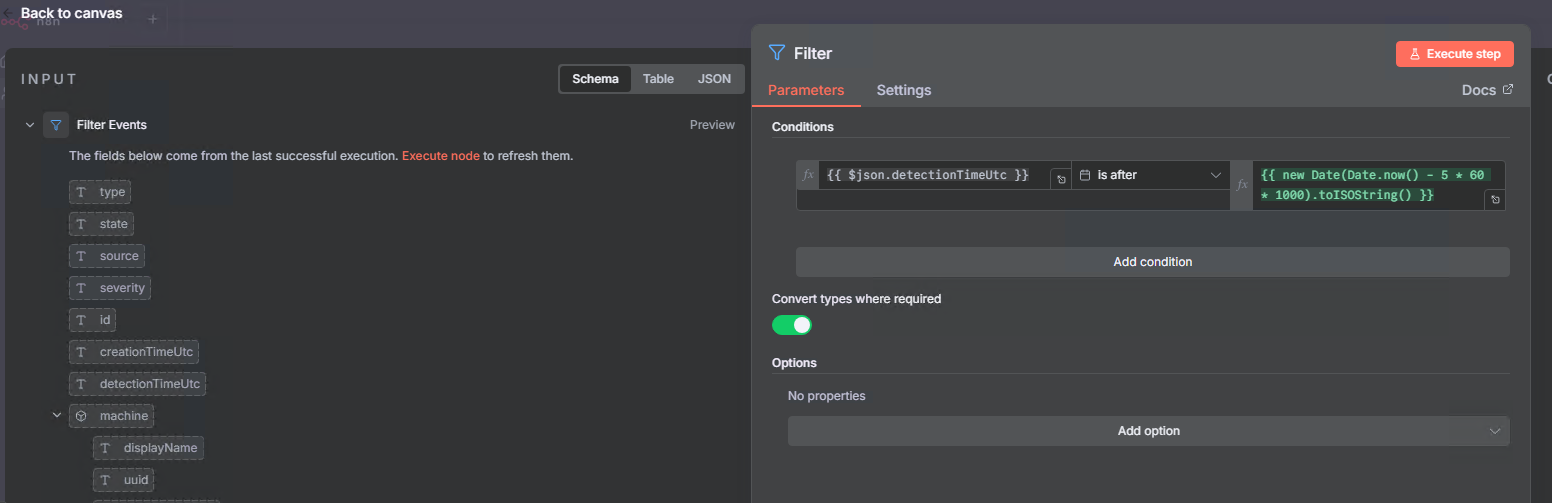
This compares the detection time against 5 minutes ago, ensuring we only act on fresh detections and preventing duplicate responses to old events.
Step 8: Send Initial Slack Alert
Let’s notify the team immediately when malware is detected:
- Add node: Slack
- Name it:
Send a message - Configure:
- Credential: Use your Slack credential
- Resource: Message
- Operation: Post
- Channel:
#n8n(or your preferred channel) - Text:
⚠️ Veeam Malware Detection Alert

Machine: {{ $json.machine.displayName }}
Detected: {{ $json.detectionTimeUtc }}
Severity: {{ $json.severity }}

VM will be powered down and a full backup taken
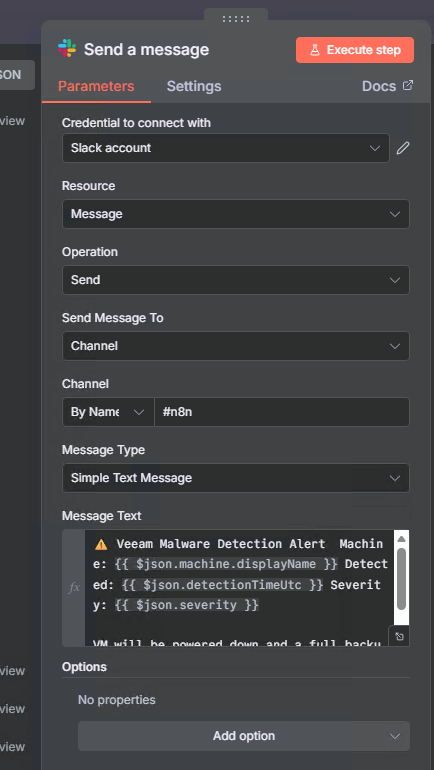
Note: At this point, Veeam’s Incident API has already been triggered, which automatically starts a backup of the infected workload. This gives you a clean recovery point before we shut down the VM.
Step 9: Authenticate with vCenter
Now we need to authenticate with vCenter to power off the VM:
- Add node: HTTP Request
- Name it:
Auth vCenter - Configure:
- Method: POST
- URL:
https://YOUR-VCENTER-SERVER/api/session - Authentication: HTTP Header Auth (use your vCenter Auth credential)
- Options → Response: Full Response
- Options → Response Format: Text
- Options → SSL Certificates: Ignore SSL Issues
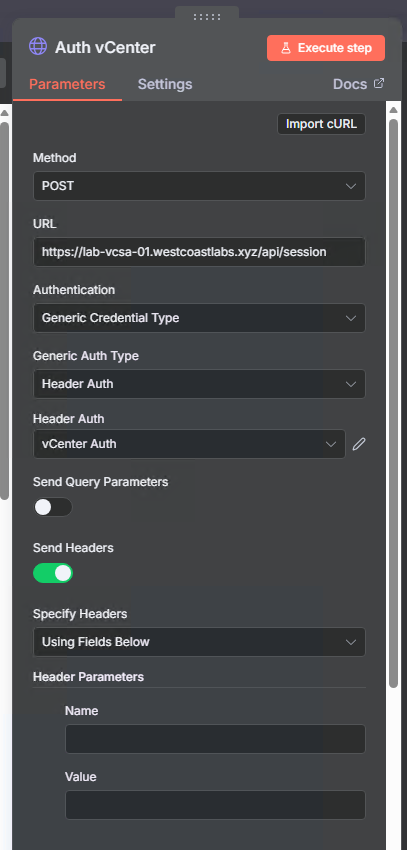
This returns a session token in the response headers that we’ll use for subsequent vCenter API calls.
Step 10: Find VM in vCenter
Locate the VM by name to get its unique identifier:
- Add node: HTTP Request
- Name it:
Get VM By Name - Configure:
- Method: GET
- URL:
https://YOUR-VCENTER-SERVER/api/vcenter/vm - Send Query Parameters: On
- Add parameter
names:{{ $('Filter').item.json.machine.displayName }}
- Add parameter
- Send Headers: On
- Add header
vmware-api-session-id:{{ $json.headers['vmware-api-session-id'] }}
- Add header
- Options → SSL Certificates: Ignore SSL Issues
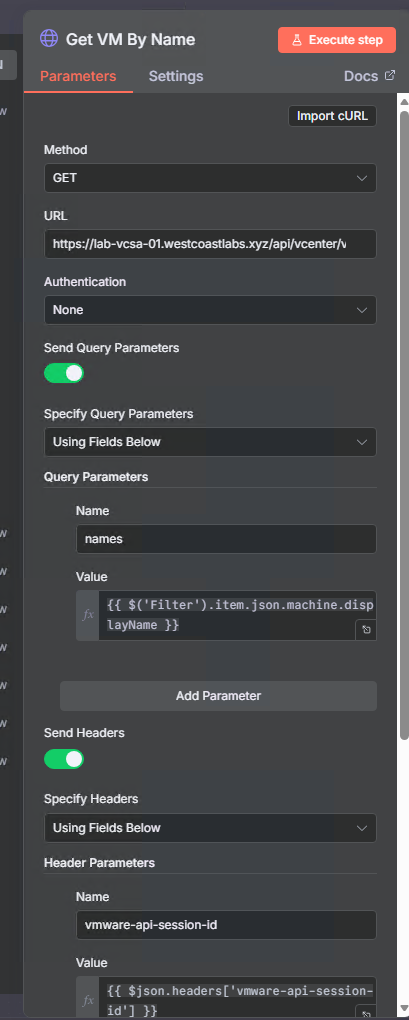
We’re using the VM display name from the malware event to search vCenter’s inventory. Note we’re referencing the Filter node’s data to get the machine name.
Step 11: Check VM Power State
Before attempting to power off, let’s check if the VM is actually powered on:
- Add node: IF
- Name it:
If - Configure:
- Conditions:
- Condition 1:
{{ $json.power_state }}equalsPOWERED_ON
- Condition 1:
- Conditions:
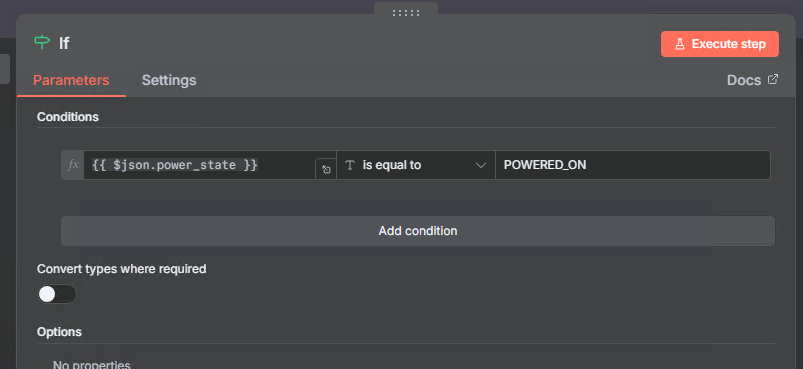
This prevents errors if the VM is already powered off and ensures we only attempt shutdown on running VMs.
Step 12a: Power Off the Infected VM (True Branch)
If the VM is powered on, this is the critical containment step:
- Add node: HTTP Request
- Name it:
HTTP Request - Configure:
- Method: POST
- URL:
https://YOUR-VCENTER-SERVER/api/vcenter/vm/{{ $json.vm }}/power - Send Query Parameters: On
- Add parameter
action:stop
- Add parameter
- Send Headers: On
- Add header
vmware-api-session-id:{{ $('Auth vCenter').item.json.headers['vmware-api-session-id'] }}
- Add header
- Options → SSL Certificates: Ignore SSL Issues
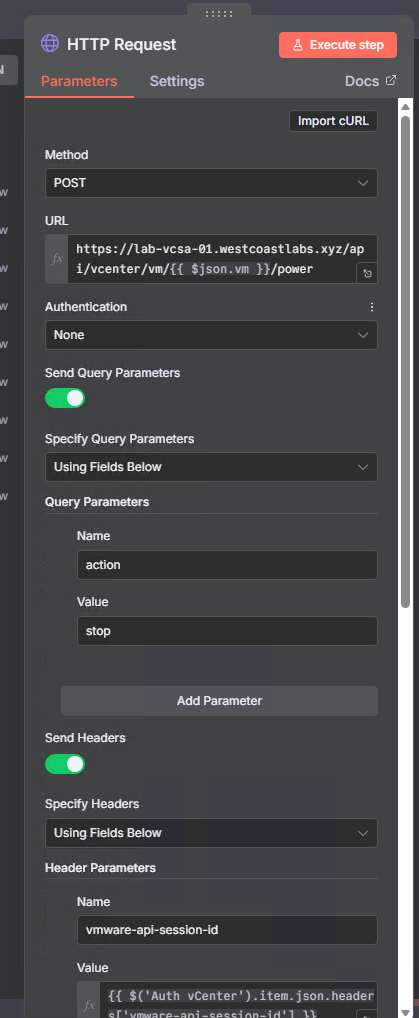
This immediately powers off the VM, stopping any malware activity and preventing lateral movement.
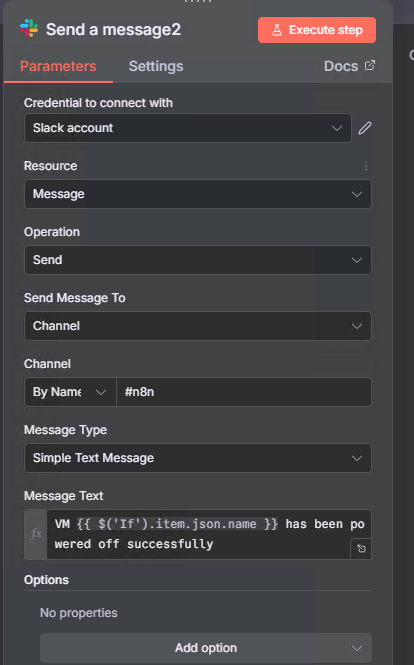
Step 12b: Send Powered Off Alert (True Branch)
Let the team know the VM has been isolated:
- Add node: Slack
- Name it:
Send a message2 - Configure:
- Credential: Use your Slack credential
- Channel:
#n8n - Text:
VM {{ $('If').item.json.name }} has been powered off successfully
Step 13: Handle Already Powered Off VMs (False Branch)
If the VM is not powered on, notify the team:
- Add node: Slack
- Name it:
Send a message1 - Configure:
- Credential: Use your Slack credential
- Channel:
#n8n - Text:
VM {{ $('Get VM By Name').item.json.name }} is in a {{ $json.power_state }} state, Skipping PowerDown steps.
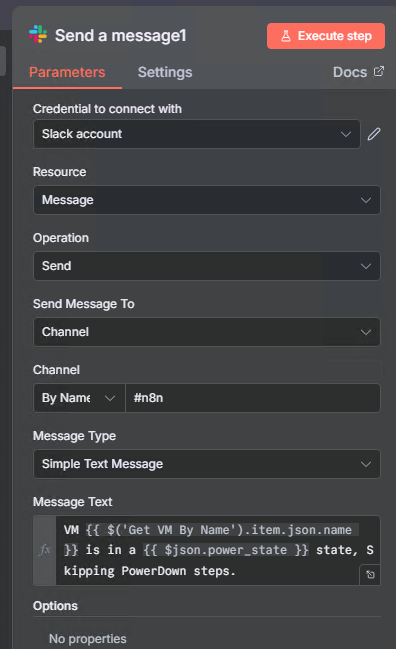
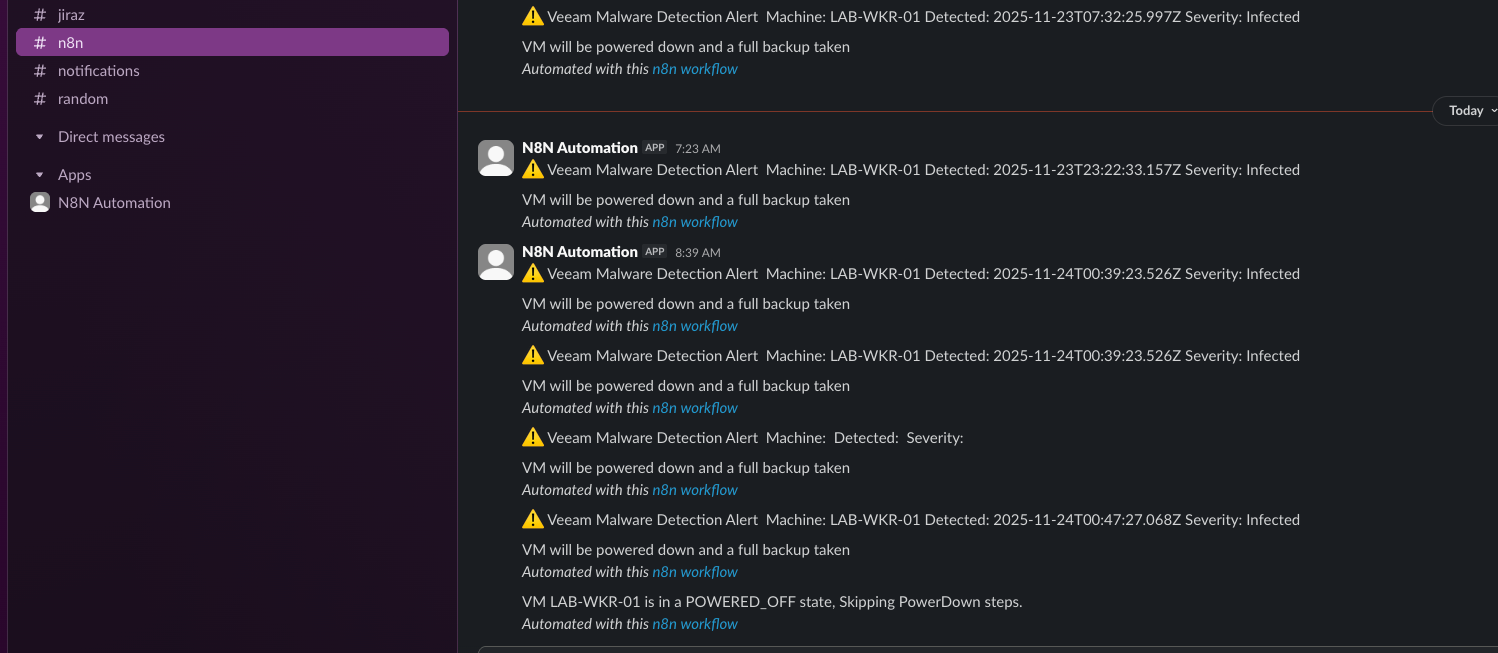
This lets your team know that malware was detected but the VM was already offline.
Understanding the Workflow Visually
Here’s what your N8N workflow looks like:
Top Row (Manual Testing Helper):
[Manual Trigger] → [Authenticate] → [HTTP Request - Create Malware Event]

Main Workflow (Bottom Row):
[Schedule: Every 1min]
    → [Authenticate]
    → [Get Malware Report]
    → [Split Out] (data array)
    → [Filter Events] (Infected OR Suspicious)
    → [Filter] (Last 5 minutes)
    → [Send a message] (Slack alert)
    → [Auth vCenter]
    → [Get VM By Name]
    → [If] (Check power state)
        ├─ [True: POWERED_ON]
        │   → [HTTP Request - Power Off]
        │   → [Send a message2] (Powered off confirmation)
        └─ [False: Already off]
            → [Send a message1] (Skip power down message)
The workflow has two parts:
- Top row: A manual testing helper to create malware events via API (saves time vs. using Swagger UI)
- Bottom row: The actual automated response workflow that runs every minute with smart power state checking
Wrapping Up
Today we built something truly powerful: an automated security response system that bridges Veeam’s malware detection capabilities with VMware’s infrastructure control. This isn’t just a proof of concept—it’s a production-ready workflow that can save your organization from ransomware disasters.
What We Accomplished:
✅ Real-time malware monitoring via Veeam REST API
✅ Automated VM isolation through vCenter API integration
✅ Instant security alerting to your team
✅ Zero-code visual workflow that anyone can understand
✅ Production-ready automation with error handling and logging
Key Takeaways:
- Speed Matters: Automated response in seconds vs. manual response in minutes can be the difference between a contained incident and a disaster
- Integration is Power: Combining Veeam’s detection with VMware’s control creates capabilities neither has alone
- Visual Workflows Work: N8N makes complex automation accessible without extensive coding
- APIs Enable Everything: Modern REST APIs make these integrations possible
The Journey So Far:
Over the past week, we’ve gone from exploring Swagger documentation to building a sophisticated security automation platform:
- Day 1-3: Learned the Veeam REST API
- Day 4: Built PowerShell integration scripts
- Day 5: Set up N8N with Docker Compose
- Day 6: Created automated malware response workflow
This is just the beginning. The workflow we built today is a foundation you can extend with additional response actions, integrate with more systems, and adapt to your specific security requirements.
Resources and Next Steps
Download the Workflow
The complete N8N workflow JSON file is available in my Github repository:
Import it directly into your N8N instance and customize for your environment.
Additional Reading
Coming Up Next
Tomorrow we’ll continue our Advent Calendar journey with more Veeam automation and integration topics. We’ll explore additional use cases and build on what we’ve learned.
Stay tuned! 🎄